
When I used my breast pump for the first time, I was slightly overwhelmed and intimidated. I worried more about the fit of the breast shield than the pump itself. It never occurred to me that I needed to learn how to use a breast pump’s settings to help me pump more milk.
Now, as an experienced pumper, I can tell you that learning to properly use your pump will not only help induce that coveted milk let down but will also help you pump more milk in a shorter amount of time. It really makes pumping so much easier when you know what you are doing and why.
How to Use a Breast Pump’s Suction and Speed Settings to Pump More Milk
So let’s start with the basics.
Features of a Breast Pump
While breast pumps vary from brand to brand, they all feature the same basic controls: suction and speed.
How you control the suction and speed will, of course, depend on the pump you are using.
Pumps like the Medela Pump in Style, Ameda Purely Yours, Ameda Finesse, etc use Dial controls that you turn to either increase or decrease the suction strength or the suction speed.

Pumps like the Spectra S1, Ameda Mya, Medela Sonata, etc use a digital screen or buttons to control these same settings where you can see an actual number associate with the suction and speed (or a bar graph type visual to show how low or high the setting is).

This will look different pump to pump but the idea is the same.
Suction and Speed Pump Settings: What are they for?
Before we get into exactly HOW to use the breast pump to pump more milk, let’s discuss the WHY.
Why do breast pumps have suction and speed settings?
Don’t you just hook the girls up, press the ON button, pump for a set period of time, and voila?
This is what a lot of moms do and while you can get away with that in some cases, you won’t be maximizing your pumping session and will be missing out on ounces pumped.
Another common misconception is that the suction and/or speed is solely for a pumping mom to find what is comfortable in terms of strength. While you never want to hurt yourself (pumping shouldn’t be painful), the purpose of the settings are not just for comfort.
So what are they for?
To put it simply, the ability to control the suction and speed of your pump allows you to mimic how your baby naturally breastfeeds at the breast.
You might be surprised to learn that while your baby is breastfeeding, they are not getting tons of milk all at once and continually. Your milk flow actually begins and stops in a series of patterns.
A baby nurses in 2 stages:
- Stimulating a Letdown (read this article what a Milk Letdown is to understand this term better)
- Expressing the Milk
Stage 1: Stimulating a Letdown
This stage begins once your baby is placed on the breast.
A hungry baby sucks frantically, quickly; with shallow suction. They are trying to get your milk to letdown as fast as possible given they are hungry.
Stage 2: Expressing the Milk
This stage begins as soon as you experience a Milk Letdown.
Once your milk lets down and is flowing, you will notice your baby will switch almost right away from that fast, shallow suck to a slow, deep suck. This slow, deep suck is pulling that milk out of the breast, draining it.
And Repeat!
This process of stimulating a milk letdown and expressing the milk will repeat over and over as long as your baby is at the breast. This is a fascinating process that has many benefits and reasons for it (like teaching your baby to recognize when they are full, increasing your milk supply, etc).
What does this mean in Breast Pump Terms?
As it relates to breast pumping, the settings for speed and suction are to mimic the stages of breastfeeding that we just covered above!
Stage 1 in pumping terms is known as Massage Mode (Fast Speed, Low Suction).
Stage 2 is known as Expression Mode (Low Speed, Higher Suction).
Brilliant, right?
Your pump was designed to mimic your baby’s natural nursing pattern. Not just provide fancy buttons.
How to Properly Use Your Breast Pump’s Settings to Pump More Milk
Now that you understand why your breast pump provides you with the ability to control the speed and suction cycles and how that relates to your baby, let’s get to the good stuff: HOW you actually use your pump’s settings to pump the most milk.
I am going to discuss this process in two sections:
- Manual Process (this will tell you how to control this manually)
- Automatic Process (this will help you understand how certain pumps do this for you and how you know what is right for your body)
Manually Setting Your Pump’s Speed and Suction
As I mentioned above, all pumps and brands will vary. Some pump feature dials that you turn up and down to control the suction and speed of your breast pump. Others will feature actual buttons. I will do my best to explain (and show you) what this will look like on various pumps.
Before starting the below steps, you will want to ensure you are all set up and ready to pump. Then just follow the steps!
Pro Tip: A handsfree pumping bra is essential if you have a pump that you need to manually control the dials. I have a list of favorites that might help if you don’t have one. You can see them, here!
Note: Pumping should NEVER hurt. As you work through these tips, ensure you are setting your pump to a level that is comfortable for you. Every mom is different.
Step 1: Locate your pump’s suction and speed control
Dial Control (found on pumps like the Ameda Finesse, Ameda Purely Yours, Medela Pump in Style, etc)
Digital Control / Button (found on pumps like the Medela Sonata, Medela Freestyle, Spectra S1 & S2, Ameda Mya, etc)
Step 2: Start with both suction and speed on LOW
Turn the manual dial or use the buttons on your digital pump to set BOTH the speed and suction to LOW (some pumps will show this as a number, so set it to a 1).
Step 3: Stimulate a Letdown (Massage Mode)
If you remember above, to stimulate a letdown while nursing, a baby will start out fast and shallow. So that’s what we will do here.
Increase the SPEED so that it is fast but comfortable. I go to a 7 or more at times here.
Gradually increase the SUCTION but keep it on the lower end. I might use a 4-5 here. Don’t go more than what is comfortable. You just want a little suction to get things going.

Set the Speed HIGH and the Suction LOW
Step 4: Wait 2 Minutes for your Milk to Letdown
Most moms will have their first milk letdown within 2 minutes in the above setting. Some moms will take longer. The more you pay attention to things like this, the better you will know your body and what is normal for you. If this takes 3 minutes, or 1 minute, that is ok. But around 2 minutes is typical and most digital pumps follow this 2-minute rule.
Step 5: Expression Mode (after Milk a letdown)
Once your milk lets down, you will get your pump into an “Expression Mode.” This is the nursing phase where your baby switches to a slow, deep suck, expressing the milk, and draining the breast.
DECREASE the Speed of your pump. I would go down to a 3-4 here.
INCREASE the Suction of your pump. I have nipples of steel and can tolerate going to an 8+ with suction on most of my pumps. But again, only go as high as you are comfortable.
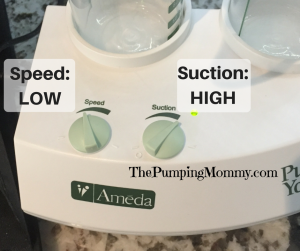
Set the Speed LOW and the Suction HIGH
Step 6: Wait for Milk Flow to Slow
You will continue pumping in Expression Mode for several minutes. Once you see the flow of your milk significantly slowing, you will want to switch back into Stimulating a letdown mode (Yes, you go back and forth!).
You can expect to stay in Expression Mode for anywhere from 3-6 minutes. Most digital pumps will switch back at the 3-minute mark. Again, as you learn your body, you will know the timeframe that best fits you.
Step 7: Switch Back to Stimulation Mode (Massage Mode)
You want to encourage your milk to letdown again. I explained earlier that as your baby nurses, you will experience several milk letdowns. Pumping is no different.
Place your pump back into a Stimulation Mode:
INCREASE the Speed
DECREASE Suction
Step 8: And Repeat!
You will keep switching from Massage Mode to Expression Mode for the duration of your pumping session.
Ideally, you will pump for 15-20 minutes. You should achieve at least 2 letdowns during a pumping session of that length but if you are really sensitive, you may get the coveted 3rd letdown!
Automatically Setting Your Pump’s Speed and Suction
All pumps allow the user to manually control the settings but only some have the capability to follow a Stimulation/Massage Mode and Expression Mode pattern.
Sometimes, making the extra investment into a pump that does this pattern for you automatically is worth its weight in gold. The good news is that many pumps with digital settings have these cycle settings ready with a touch of a button or in some cases, the pump automatically changes modes for you (I’m looking at you, Medela Sonata).
Medela, for example, calls this their “2-Phase Technology.”
How to Use Your Breast Pump’s Massage Mode and Expression Mode
I went over what Massage Mode and Expression Mode are earlier but as a reminder Massage Mode is a fast/shallow pattern and Expression Mode is a Slow/Deep pattern.
Your pump likely features a Massage Mode and/or Expression Mode button. You can use your pump’s user guide to locate this button as most are just icons and if you aren’t familiar with it, you may have missed it.
You will find a variety of pumping options depending on your pump. This will include pumps that:
- Have only an Expression Mode button
- Have a Massage Mode AND Expression Mode
- Have a Memory Mode that gives the option to record preferred pump settings and replay it each pumping session (my favorite feature!)
Expression Mode ONLY Pumps
Pumps that feature an Expression Mode only, typically work like this:
- The user would need to set the pump manually into a Massage Mode (see above for stimulating a letdown manually).
- Once a Milk Letdown is achieved, the user presses the “Milk Letdown” button to automatically switch the pump into an Expression Mode.
- The user then would need to switch the pump manually back into a Massage Mode and then press the let-down button again.
As you can see this does save some time and effort since the Expression Mode is automatically set for you. You would, of course, need to change the suction strength to your own liking every time you pump.
This is the most basic of the automatic features.
The Medela Pump in Style features a letdown button as an example.
Massage Mode AND Expression Mode Pumps
Pumps that feature an automatic Massage Mode and Express Mode make pumping extremely easy!
They do exactly what it sounds like, they feature buttons that allow you to switch back and forth between Massage Mode and Expression Mode.
The Medela Sonata will actually switch modes for you after a set amount of time. This is a really cool feature.
Another good example of a pump with a Massage and Expression Mode button is the Milk Genie.

Record/Memory Option
A memory option is by far my favorite feature on a breast pump.
Pumps that include this feature allow you to record your pumping session and then will follow that same pattern every time you pump when you turn on the Memory Mode.
This makes pumping amazingly easy!
No going back and forth. Really you just turn the pump on and let it do its thing.
The best part is that it is customized for YOUR body and pumping session. For example, I know that I will always hit my first letdown 1 minute into pumping. Always. I also know about 4 minutes later, my milk will slow enough for me to switch back into Massage Mode. Every time.
So being able to customize my pump to follow my pattern exactly is a huge time saver!
Pumps that feature a Memory Mode include the Motif Duo, Medela Freestyle, Spectra S1, Motif Luna etc.

Manual Controls vs Automated: Which is Better?
Now that we have covered just about every possible control option from pump to pump, you might be wondering which is better.
Most would say without a doubt that an automated pump is better. But is it?
I have to say, I love technology and all my pumps (I own way too many) that feature some sort of automated option are amazing. BUT I find manually controlling the pump at times is just as good and sometimes I actually prefer it.
There are things to consider with an automated pump setting:
- You will need to adjust the Suction and Speed every time. They don’t remember your settings and you will have to manually change it if the automated setting isn’t to your liking. Having a pump that features a Memory Mode is the only way around this.
- The pump will leave off on the setting that the pump was in when you turned it off last. So if you were in Expression Mode and then decided you were done pumping and turned the pump off, when you turn it on again, you will get quite a surprise (that strong suction when you are just starting your session is not fun). It’s best to set the speed and suction on LOW after you are done pumping to avoid this.
- You will still need to switch the pump into the Expression and Massage Mode. Even if you are simply pressing a button. It is still user-controlled in some cases. But as I explained earlier, some pumps will switch automatically which is awesome (Medela Sonata)! But again, unless you are using a Memory Mode, it won’t remember what suction/Speed setting you prefer.
So as you can see, a pump with an automated feature can save a bit of time but overall, you are still having to manually adjust your pump in some way.
The only pumps that I would say truly have a leg up when it comes to settings are pumps that features Memory Mode. They are completely automated and allow hands-off pumping!
I love many pumps that don’t have automated features (like the Ameda Finesse). I also love my Memory Mode pumps (like the Medela Freestyle). And I love a lot of pumps in between.
At the end of the day, if you know how to properly work your pump manually, you can pump with anything. Having those extra features are nice to have’s but you will find that not having to rely on them is huge. Especially if you struggle with achieving a milk letdown while pumping.
Learn how to use your pump’s settings and why your pump does what it does so that you have a good foundation for pumping. Then enjoy any automated features that your pump has as a little extra!
Leave a Reply